Getting around
Logging in
Go to yourbusiness.nunkio.com/wp-admin (or your own domain followed by /wp-admin) and log in with the details we sent you. Everything for your bookings is under Nunkio Booking in the dark menu on the left:- Dashboard: today at a glance: bookings, services, upcoming events.
- All Bookings: every session booking, with confirm, cancel and refund buttons.
- Services: the one-to-one or small-group sessions clients book.
- Packages: bundles of sessions sold at a set price.
- Events, Workshops & Classes: group events with a fixed date and time, including repeating classes.
- Availability: your weekly working hours for session bookings.
- Settings: payments, emails, colours, Zoom, Google Calendar and more.
The Dashboard
The Nunkio Booking Dashboard shows today's bookings, how many active services and upcoming events you have, and your next appointments and events. Yellow boxes warn you when something isn't connected yet, such as payments or Zoom.
Services
A service is something a client books one-to-one (or in a small group) at a time that suits them, from your available hours. For example: a 60-minute Reiki session.
Your services list
Go to Nunkio Booking → Services. Click a service's name to edit it, or Add New Service to create one.
Adding or editing a service
Type the service name at the top, then fill in Service Details:- Description: a short line shown under the service name on the booking form.
- Price: the price per session.
- Pay in person / later: Use site setting, Allow (clients may pay later, e.g. cash or EFT) or Online payment only.
- Duration: session length in minutes. It sets the time slots on the booking form.
- Max / Min capacity: 1 = private session. Higher = small group in the same slot.
- Session location: In person, Online via Zoom, or Both, client chooses. Zoom needs the Zoom setup done first.
- Buffer before / after: minutes kept free before or after this service, e.g. 15 minutes to reset the room.
- Physical location: the address shown to clients for in-person sessions.
- Calendar colour: the colour of this service in your booking calendar.
- Featured image (on the right): an image shown with the service.
Click Update (or Publish for a new service) to save.
Hiding a service for a while? Change its status to Draft in the Publish box and click Update. It disappears from the booking form, but nothing is lost.
Packages
Packages let clients buy several sessions up front, usually at a discount, then book each session without paying again.
Creating a package
Go to Nunkio Booking → Packages → Add New Package and fill in:- Service: which service the sessions are for.
- Sessions: how many sessions are included.
- Package price: the total price for all the sessions.
- Expires (days): how long the client has to use the sessions after buying, e.g. 365.
- Description: shown with the package on the booking form.
How clients use a package
- On the booking form, clients click View package deals to buy one.
- Each time they book that service while logged in, a session is taken from their package and they don't pay again. In All Bookings it shows R0.00 · Package.
- If a package booking is cancelled, the session goes back into the client's package.
- Clients see how many sessions they have left in their account (the Log In / account menu on your website).
Availability
Go to Nunkio Booking → Availability. For each day, enter the times you're available for sessions. Use + Add block to add a second block, e.g. 09:00–12:00 and 13:00–17:00 for a lunch break. Leave a day empty if you don't work that day. Click Save availability.
Buffer time between appointments adds a gap after every booking.
Days off and holidays. If Google Calendar is connected, anything in your Google Calendar automatically blocks those times. That's the easiest way to block out a holiday or a personal appointment.
Events don't use these hours. Events, workshops and classes have their own date and time, so you can schedule them outside your normal hours.
Events, workshops & classes
Events happen at a fixed date and time, and several people can book them: a workshop, a retreat or a weekly class.
Adding an event
Go to Nunkio Booking → Events, Workshops & Classes. Fill in Add new event at the top and click Create event.- Title / Description: what clients see on your events calendar.
- Venue / Address: where it happens. For online events, type e.g. “Online via Zoom”.
- Location type: in person, online via Zoom, or both. With Zoom connected, the meeting link is created and sent to attendees for you.
- Start / End date: leave End date blank for a one-day event. Fill it in for a multi-day event such as a weekend retreat.
- Start / End time: start time on the first day, end time on the last day.
- Max / Min capacity: how many people can book.
- Price: per person. Use 0 for a free event.
- Pay in person / later: the same choice as for services.
Repeating classes
For a regular class, set Recurrence to Daily, Weekly or Monthly. For weekly, tick the days it runs. Leave Repeat until blank to keep it going: the next few months of dates are always open for booking, and more are added automatically.
Your upcoming events
Below the form is your list of events. Repeating events show their pattern and how many upcoming dates there are.- Edit changes the event. For a series, changes to the pattern apply to the whole series. Dates that already have bookings are kept.
- Dates shows every date in a repeating series, so you can edit or cancel a single date (e.g. a public holiday) without touching the rest.
On the Dates screen, Select all dates with no bookings cancels several unbooked dates at once, and Cancel next to a date cancels just that one. If people have booked a date you cancel, they're notified.
Managing bookings
All Bookings
Go to Nunkio Booking → All Bookings. Use the links at the top to show only Confirmed, Pending or Cancelled bookings.- Confirmed: booked and paid (or confirmed by you).
- Pending + Pay later: the client chose to pay later. Nothing has been paid yet.
- R0.00 · Package: paid for from a package the client already bought.
- Cancelled: cancelled by you or the client.
The action buttons
- Confirm: on a pay-later booking, once the client has paid you (cash, EFT, at the session). Check the amount in the box first. It records the payment and sends the client a confirmation.
- Complete: after the session has happened, to keep your records tidy.
- Cancel: cancels the booking. The client is emailed, the Zoom meeting and Google Calendar event are removed, reminders stop, and a package session is returned.
- Refund (Stripe) / Refund (PayPal): sends the money back to the client automatically.
- Mark as refunded: for PayFast, cash or EFT payments. First refund the client yourself (PayFast refunds are done in your PayFast dashboard), then click this so your records match. It doesn't send money.
Cancelling doesn't refund automatically. Cancel and refund are separate steps, so you can decide whether a late cancellation gets its money back.
Rescheduling
Clients can reschedule their own bookings from their account on your website, up to the Reschedule window you set in Settings → General. If you allow it, they can cancel there too. Any change updates Zoom and Google Calendar automatically, and you're emailed.
Settings
Go to Nunkio Booking → Settings. Each tab has its own Save settings button at the bottom. Click it before switching tabs.
General
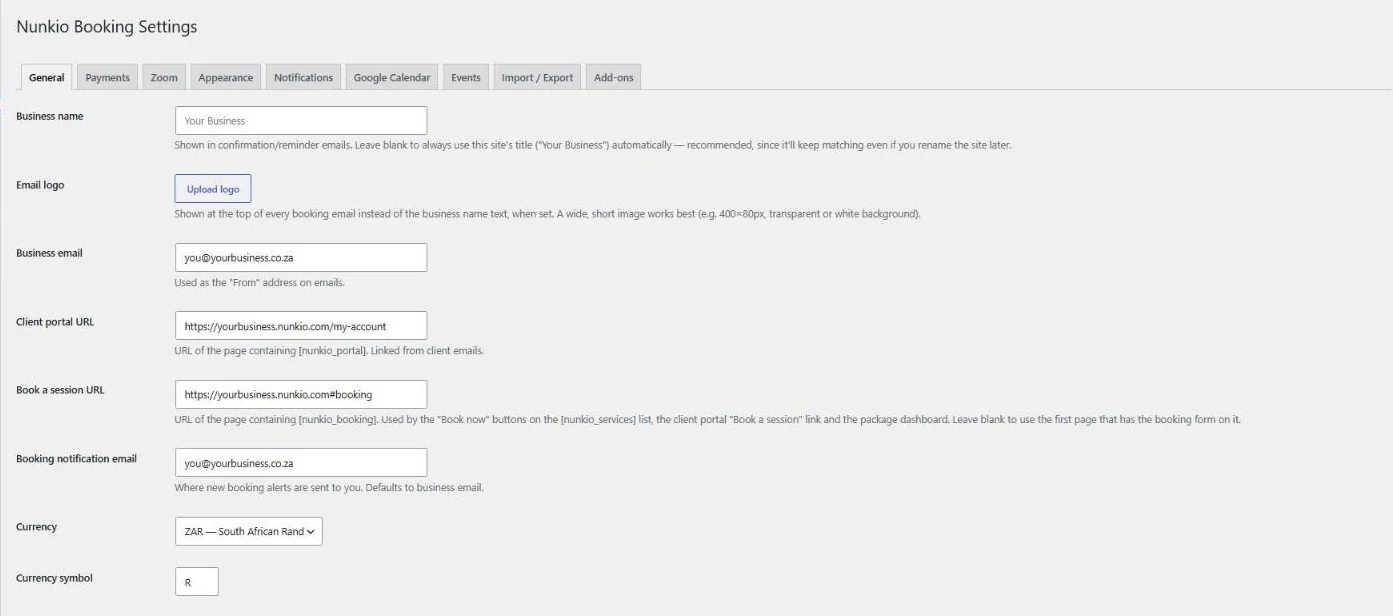
- Business name: used in emails. Leave blank to use your website's name.
- Email logo: a wide, short logo (about 400×80px) shown at the top of booking emails.
- Business email: the “From” address on booking emails.
- Client portal URL / Book a session URL: already set up for you. Only change these if we ask you to.
- Booking notification email: where new-booking alerts go.
- Currency / Currency symbol: set up for you. Changing the currency also changes which payment methods appear.
- Allow clients to cancel their own bookings: adds a Cancel button in your clients' accounts.
- Cancellation / Reschedule window: how many hours before a session clients can still cancel or reschedule. 48 = 2 days.
- Package expiry: the default number of days to use a package, if the package doesn't set its own.
- Demo mode: must be off on your live website. When it's on, no bookings are saved.
- Keep data when plugin is deleted: leave ticked. It protects your bookings.
Payments
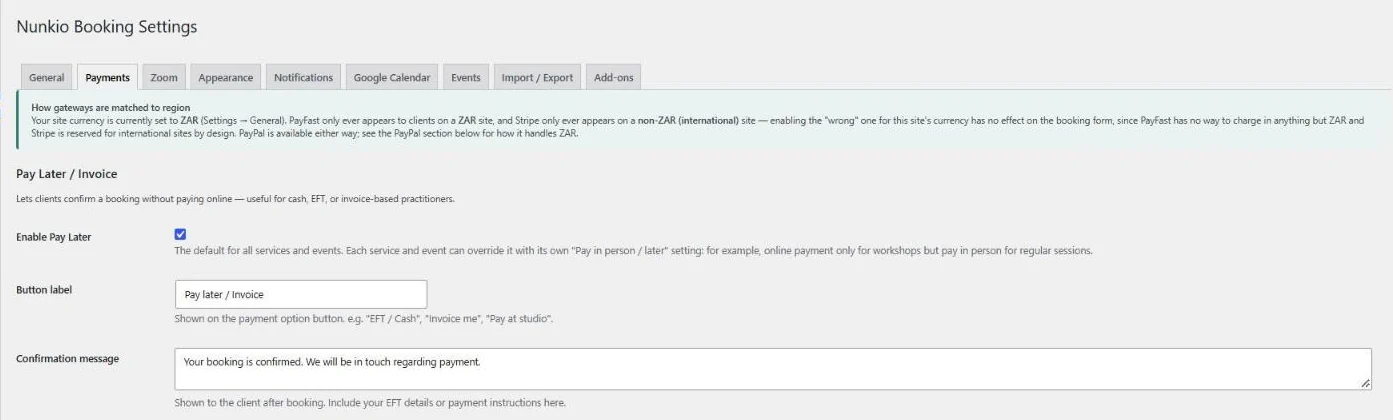
Pay Later / Invoice lets clients book without paying online. You can change the Button label (e.g. “EFT / Cash”) and the Confirmation message clients see after booking; put your EFT banking details there if you take EFT. Each service and event can override this setting.
The PayFast, PayPal and Stripe sections are where you paste your payment details. Follow the setup guide for each: PayFast, PayPal, Stripe. PayFast only shows on Rand websites, and Stripe only on websites in other currencies.
Zoom and Google Calendar
These tabs are where you paste the codes from those services. Follow the Zoom setup guide and the Google Calendar setup guide.
Appearance
Change the colours of the booking form, services list, events calendar and emails to match your website. Click a colour box and type or paste a colour code (e.g. #7B5EA7). The small previews update as you go. Click Save settings to apply.
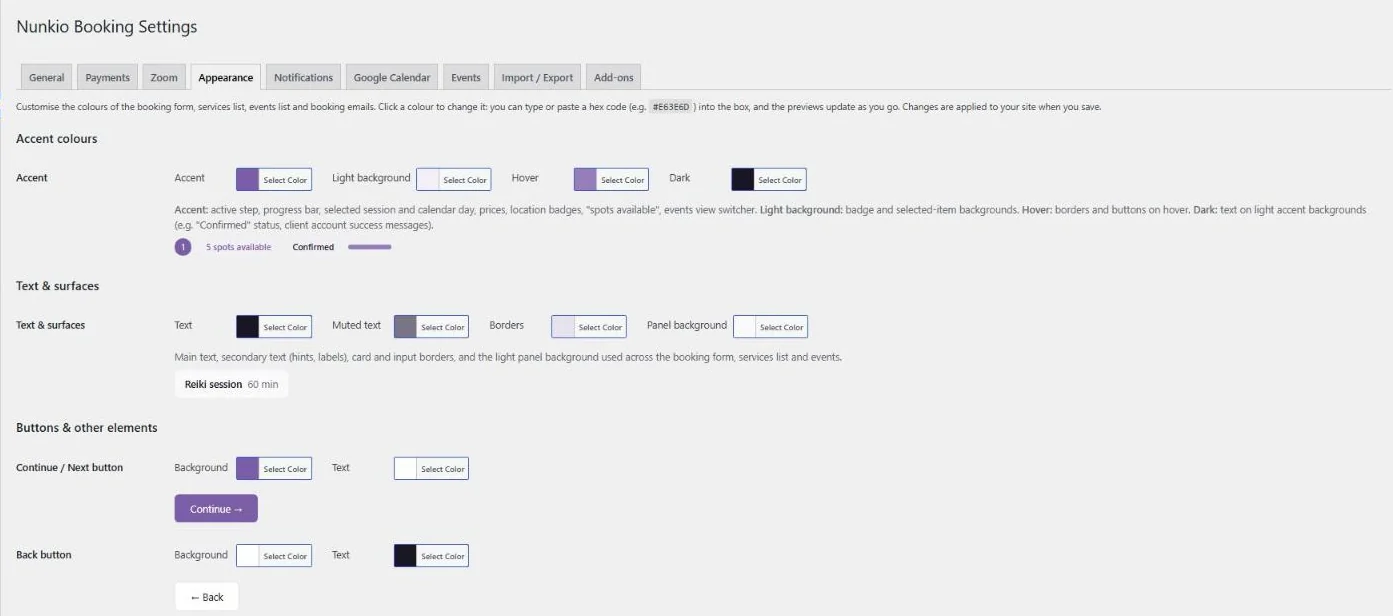
- Accent colours: selected items, the progress bar, prices and badges.
- Text & surfaces: text, hints, borders and panel backgrounds.
- Buttons: Continue, Back, View package deals and Book now buttons.
- Booking form steps: the step labels above the form. Useful on a coloured background.
- Events list date: the date block in the events list.
- Header account menu: the Log In / account link in your website header.
- Booking emails: the header bar and buttons in your emails.
Notifications
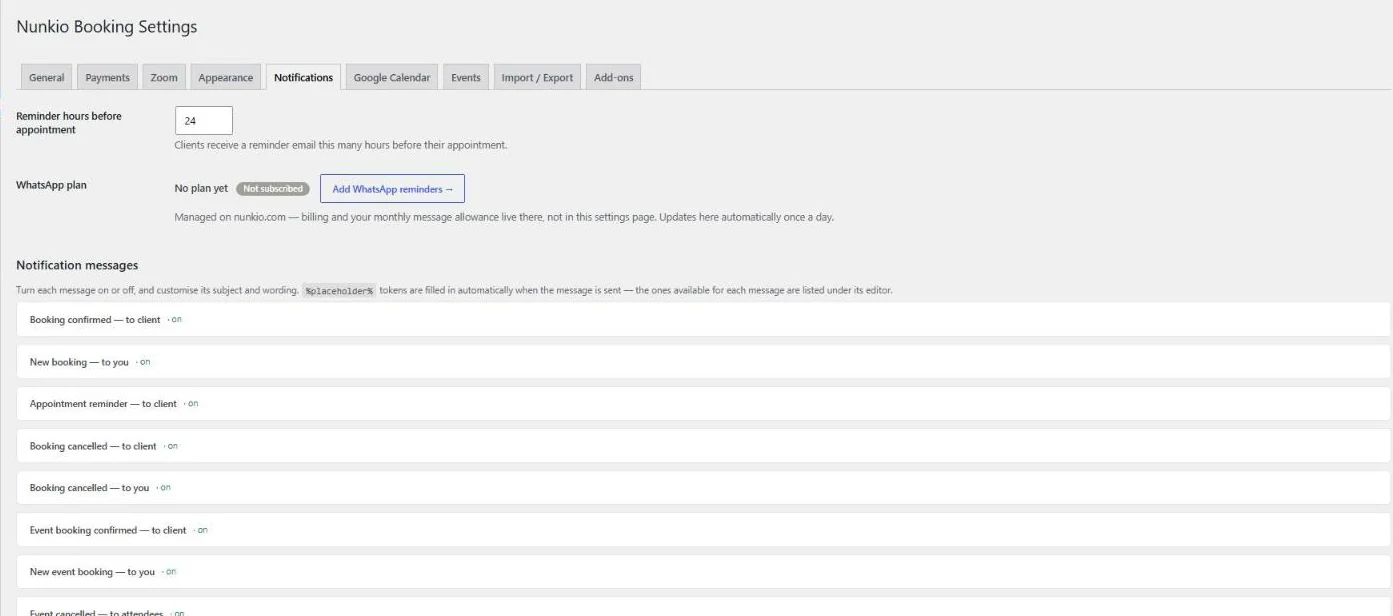
- Reminder hours before appointment: when clients get their reminder, e.g. 24 = the day before.
- WhatsApp plan: shows your WhatsApp Reminders package. Click Add WhatsApp reminders to order (see the WhatsApp guide).
- Notification messages: click any message to open it. You can switch it on or off, and change the email subject and greeting.
Words between % signs, like %customer_name%, are filled in automatically. The available ones are listed under each message. The booking details (date, time, price) are always added below your greeting.
Events
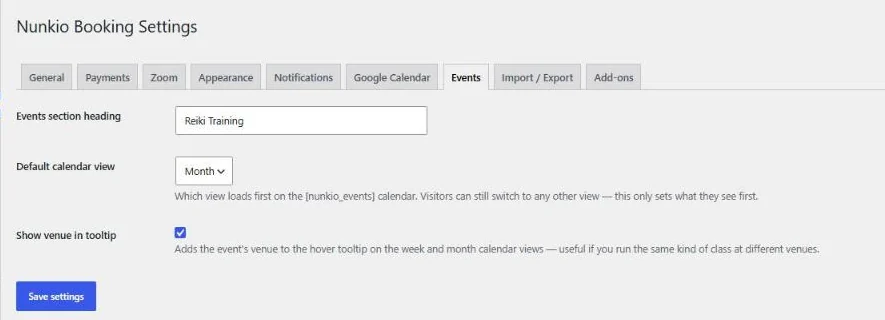
- Events section heading: what your events are called in the menu and on your site, e.g. “Reiki Training” or “Classes”.
- Default calendar view: which view (e.g. Month or List) visitors see first.
- Show venue in tooltip: shows the venue when visitors hover over an event in the calendar.
Add-ons
Extras you can order for your website: extra pages, a blog, WhatsApp Reminders and domain names. Click Order now to see details and order on nunkio.com.
Backups
Go to Settings → Import / Export and click Download data backup every month or so. Keep the file somewhere private: it contains your clients' names, emails and phone numbers, plus your services, packages, events, availability and every booking. If anything ever goes wrong, we can restore from it.
The Export settings button at the top of the page downloads your settings separately, including payment details, so keep that file private too.
Import replaces data. Import settings and Restore from a backup are for restoring a site or moving to a new one. They overwrite what's there, so please email us before using them.
What your clients see
Clients book in four steps: Session → Date & time → Details → Pay. Your services (and a View package deals button if you have packages) appear in step 1, with only the times you're free in step 2.
After booking, clients receive a confirmation email (and a WhatsApp message, if they chose it and you have WhatsApp Reminders), plus a reminder before the session. They can log in to see their bookings, reschedule, and check their package sessions.
Test it yourself. Make a booking on your own website with your own email address to see exactly what clients get. Cancel it from All Bookings afterwards.
Quick answers
A day shows no available times
Check Availability has hours for that day, that existing bookings or buffers aren't filling it, and that nothing is blocking it in your Google Calendar.
How do I take a week off?
Add the week to your Google Calendar (if connected). Otherwise remove your hours in Availability for those days, and put them back afterwards.
A client paid by EFT
Find the Pending booking in All Bookings, check the amount and click Confirm.
I want to stop a weekly class
Edit the event and set Repeat until to the last date. Dates with bookings are kept.
Clients aren't getting emails
Ask them to check their spam folder, then email us. We look after email delivery on your website.
Can I change the wording of emails?
Yes: Settings → Notifications, then click the message.
I changed something and it didn't save
Each settings tab has its own Save settings button. Click it before moving to another tab.
Need help? Email support@nunkio.com with a screenshot of what you're seeing. If you have a Nunkio website, the PDF version of this manual is in your account on nunkio.com and inside your plugin dashboard. Please never email us passwords or secret keys.